Project-based Classes
Unless otherwise noted, beginners are welcome in all of these classes.
So are returning students who'd like
to add more techniques to their metal clay repertoire.
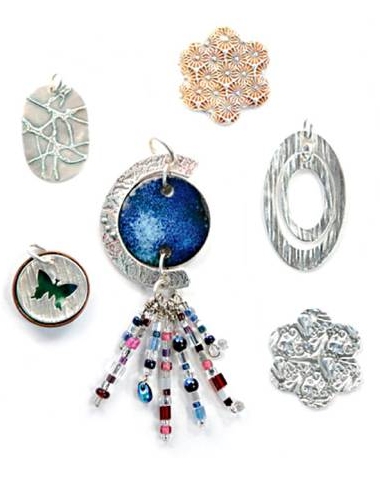
- How Charming! Make several small fine silver charms that you can later dangle from a bracelet, necklace, earwires, cell phone, key ring, or wherever else strikes your fancy.
or
- So Precious! Make one large focal piece that can be hung from a necklace chain alone or find itself serving as a focal piece your own beadwork.
or
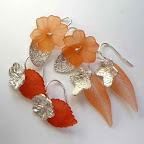
- Delight Earrings Make small charms and combine them with other basic compoments. (Shown, right: combined with Lucite flowers, leaves, or butterflies to make Garden Delight Earrings)
Metal clay is an amazing innovation: fine silver particles are mixed into an organic binder. It feels like clay as you texture, shape, and embellish it; then you apply heat so that you are left with pure silver!
Join us for an exploration of this process. Make one large pendant, or a smaller pendant and a pair of earrings. We'll use thick clay to make each basic shape, then decorate them with lovely trails of watered-down clay.

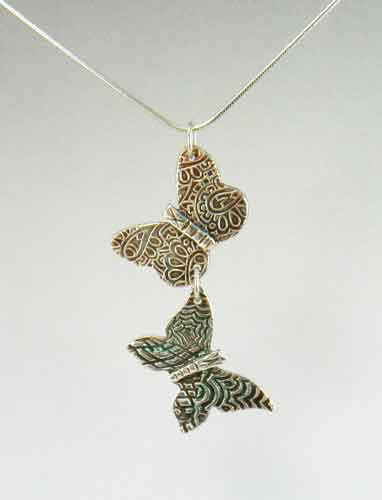
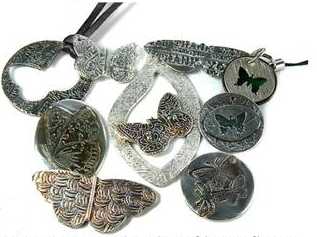
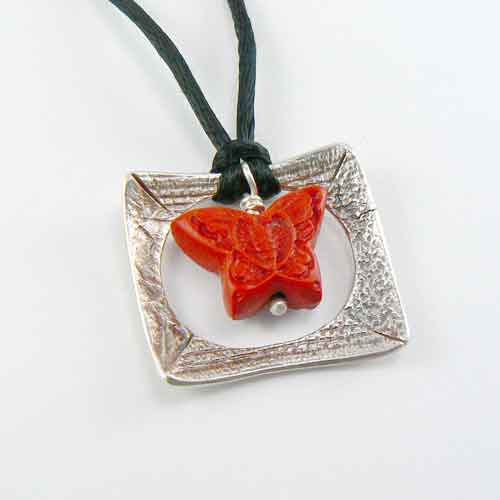
As the butterflies of summer flit about your garden, helping to pollinate the plants while offering joy and amusement to those of us who watch them, consider spending an afternoon capturing the idea of butterflies in metal clay and turning them into fine silver baubles that can be admired all year.
We will cover a variety of basic metal clay techniques, so you can make your choice of simple charms, earrings, beads, pendants, bookmarks, or sun-catchers, all with a butterfly theme.
In addition, some information on gardening for (live) pollinators, such as butterflies, will be provided for any students who are interested in that.
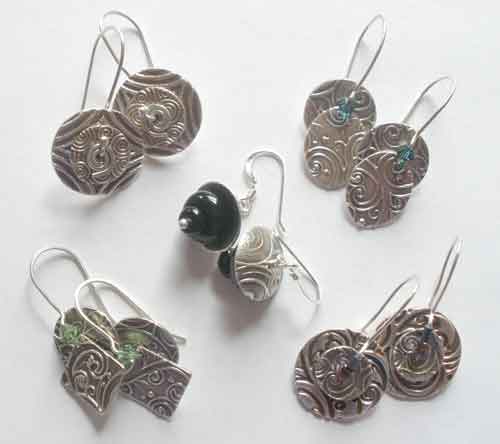 |
Learn how to make simple fine silver components from metal clay. We will combine them with a few beads and wire into lightweight earrings with just enough movement so they're distinctly fun to wear and to be seen wearing.
If you've never worked with metal clay and wondered what it was like, this is a great project for trying it out. Those with some prior experience will have the chance for more good practice time. Learn about making your own earwires on which to hang your one-of-a-kind creations. And, as time permits and interest indicates, we can cover a few nice finishing techiques too.
(I enjoy offering this class in a bead store, where participants can select one or two pairs of colorful beads to embellish their earrings. At other sites, I provide a small selection of crystal bicones, seed beads, and small round beads for that purpose. In either setting, of course, if participants who have a few favorite beads they'd like to work into their designs, they are welcome to bring those. Contact me if you have questions about whether your beads will work in these projects.)
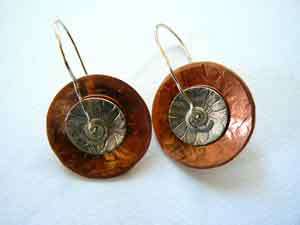
Here's a pair of copper and silver disk earrings for now, until I get pictures of several all-silver sets:
Make a fine (.999) silver pendant, necklace components, or a pair of earrings with a bit of swing to them!
While "traditional" wire- and metal-workers talk about "hot" and "cold" connections (e.g., solder, rivets, etc.), metal clay offers yet a third option: clay connections that simulate a number of the basic ways to connect metal to metal. Participants in this workshop will be guided in the use of one of two novel connection methods. Make a piece of jewelry that incorporates some interesting motion to draw viewers' eyes to your unique creations.
This session is appropriate for those at all levels: beginners will learn how to work with metal clay, and those with some experience will practice several new techniques.

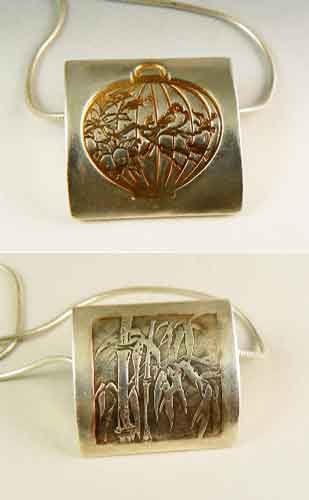
Learn the basics of working with metal clay, including how to layer patterns. Make a two-sided pendant: apply a collage, mosaic, or quilt-like pattern on one side; the other side can be plain, or it can display one overall texture that either complements or contrasts with the collage.
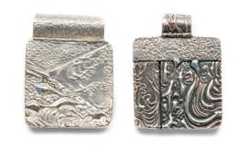
You'll have the choice of designing a piece you'll be proud to wear on its own, or one that you can later string as a focal point in your own beaded creation. (In some (longer) versions of this class, you'll also have the option to make a pair of earrings.)
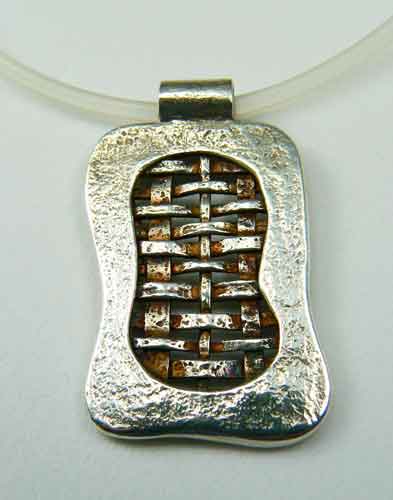
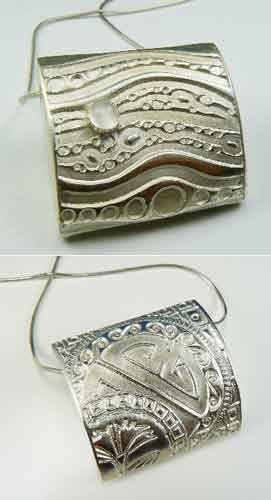
Learn the basics of working with metal clay, including how to weave strips and strings of metal clay and frame them in the shape of your choice to make your own one-of-a-kind pendant. Learn to work with regular "lump" clay straight from the pack and with the wonderful "flexible greenware" that remains pliable, and thus weave-able, even after it has dried.
You'll have the choice of designing a piece you'll be proud to wear on its own, or one that you can later string as a focal point in your own beaded creation.
(For this version, I like to allow 4.5 hours, with a short break built in; some venues prefer that it be limited to 4 hours, without any official break. Either way, of course, there are times when each individual participant can take a break if they need one.)
|
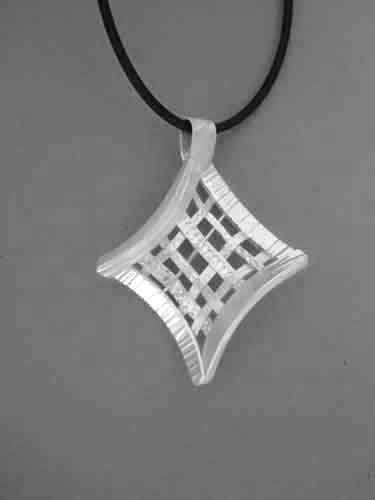
In this slightly more challenging workshop, you can even take your weaving into three dimensions!
Beginners can make a piece like this if the workshop is scheduled to last an entire day. In less time than that, participantion should be limited to those with some prior experience working with metal clay. (You certainly do not need te an expert to do this, and I will teach each step in the process. The issue is simply time: This project just takes longer, so we either need to schedule more time, or have participants who don't need to start from the very beginning about what metal clay is.)
Learn the basics of working with metal clay, including how create amazing (and light weight) silver nuggets by painting silver paste over black lava beads before firing them.
You'll have the choice of making several large nuggets that you can string onto a necklace of your choice, or a larger number of smaller nuggets that you can use in a bracelet and/or earrings.
(This class must be held at a site will either provide a kiln or allow us to operate one of our own during the class.)
A short version is offered for experienced beaders, who can take their beads with them and string them later on, while a longer session is available the covers the basics of bead stringing.
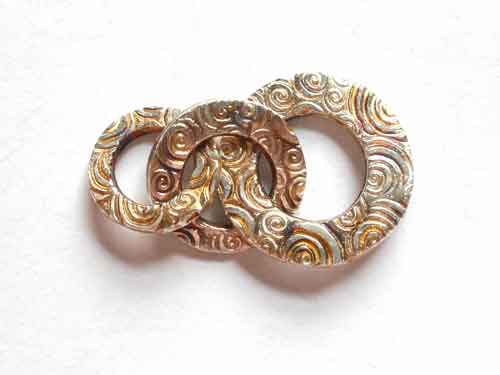
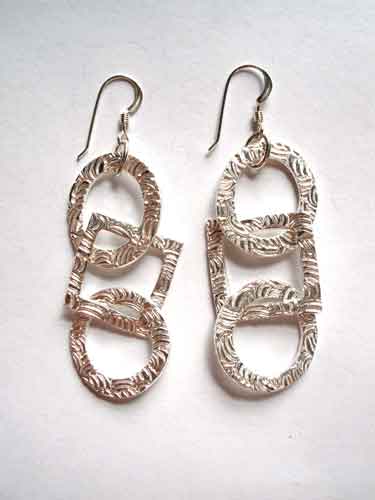
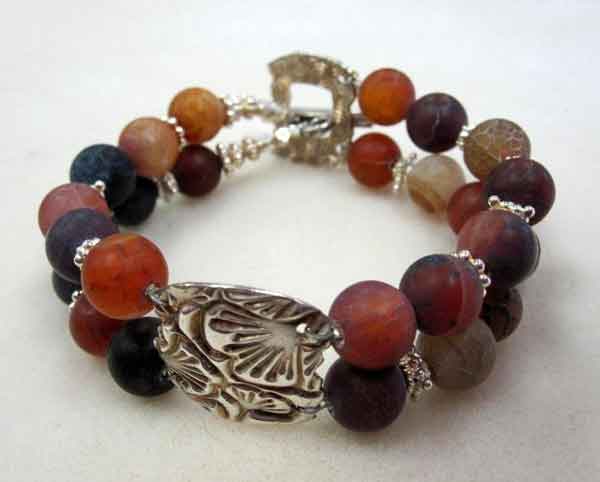
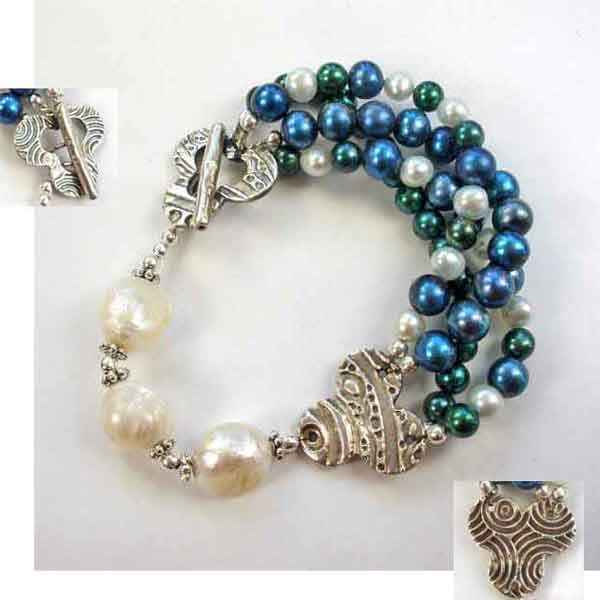
Learn how to use fine silver metal clay to make and connect your own unique silver link components. These pieces may be used either decoratively (e.g., as earrings or pendants) or structurally (as the basis of a chunky bracelet or necklace chain).
In a half-day or evening session, although we will focus on decorative uses (i.e., completing enough components to use in earrings or as a pendant), those who wish to extend this idea to a bracelet or full-length necklace will gain enough skill to be able to continue on their own after the class.
The structural-length version (bracelet or necklace) can be completed in a full-day private (or small group) lesson. Although this version is rarely scheduled as a general public class, it is happily offered by request.

Learn the basics of working with metal clay, including how to form and shape it.
You'll have the choice of designing a piece you'll be proud to wear on its own, or one that you can later string as a focal point in your own beaded creation.
A variety of forms will be provided, to let you choose the domed or curved shape of your choice.

Learn the basics of working with metal clay, including how to form it into a domed shape.
You'll have the choice of designing a piece you'll be proud to wear on its own, or one that you can later string as a focal point in your own beaded creation.
- Option #1: Lentil Bead
- Make two domed circles, and attach them into a single, reversible, hollow "lentil-shape" bead!
- Option #2: Mini Lentil Beads
- Instead of one larger bead, make several smaller ones that work great as spacer beads. Use them in your own beaded design, or combine them with silver tube or spinner beads (described below).
- Option #3: Donut Bead
- Make two domed ring shapes, and attach them into a single, reversible, hollow "donut-shape" bead! (I have taught donut beads in private lessons, but would need extra lead time to prepare enough donut-shaped armatures for a full class.)
- Option #0: Basic Domed Beads
- Sometimes I split the hollow-beads workshops into two parts. In the first, you will just make several domed pieces. You may stop at that point and have several lovely pieces, or you may continue, and use those domes for making hollow beads.
Learn the basics of working with metal clay, including how to form it into a curved shape, and how to combine several different shapes into a single, one-of-a-kind, reversible, hollow "pillow-shape" bead!
You'll have the choice of designing a piece you'll be proud to wear on its own, or one that you can later string as a focal point in your own beaded creation.
(This is one of my longest-length classes. Beginners can make a piece like this if the workshop is scheduled for a full 8-hour day. Even experienced metal clayers will need 5.5 to 6 hours. You certainly do not need to be an expert to do this, and I will teach each step in the process. The issue is simply time: This project just has multiple steps, and the pieces need time to dry between each one. So we need to schedule enough time including, if necessary, the extra required for those who need to start from the very beginning about what metal clay is.)
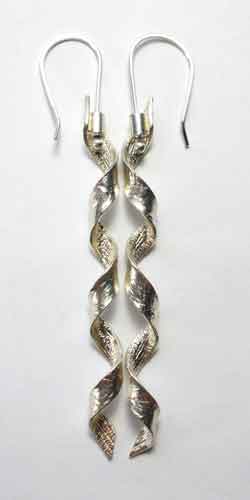
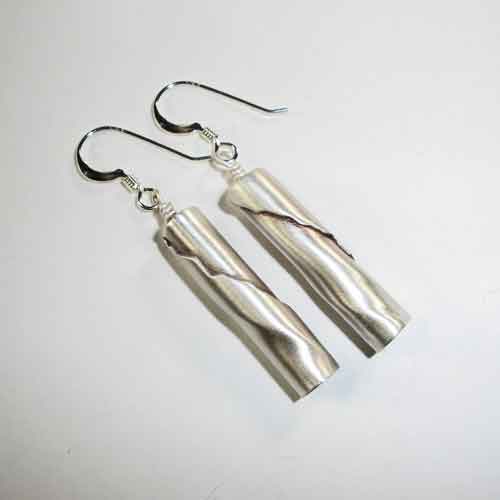
Learn the basics of metal clay, including how to texture, trim, and form it into twists and spiral shapes.
One particular kind of project is covered in each session; groups of these are awesome when offered as a multi-part series!
Consider taking or requesting the mini lentil bead class too; a small lentil bead makes a great spacer between a couple of tube beads (regular or spinners)!
|
- These classes are all fine for beginners, or those with some experience who want to learn a new technique—take one, or another, or all three,
in any order:
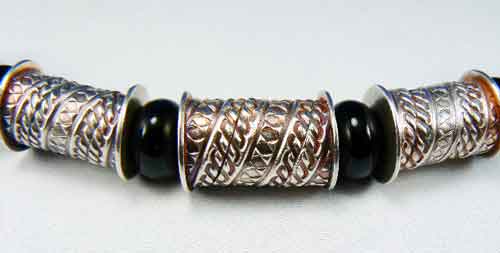
- Simply Stupendous Cylinders!
- Make one (pendant) or two (earrings) in a simple cylinder (tube) shape. These may be constructed, if you wish, so they will swirl even more when worn! (3.5)
- Do the Twist!
- Make one (pendant) or two (earrings) in an open swirl shape. These may be constructed, if you wish, so they will swirl even more when worn! (4.0)
- Spin Some Silver Spools!
- Make one to three beads in a closed swirl shape,
and cap their ends so that, after class, you can
string them onto a necklace, bracelet, or earrings.
(4.5)
|
Cylinders:
| |
|
Spools:
|
BWECs:
INSERT PHOTO- These worksops are fine for advanced beginners on up—take one, or two, or all three,
in any order, after you have completed
at least one of the beginning swirl projects.
- Capped Cylinder:
- We'll cover several new assembly and finishing techniques in the process of making a large "focal bead" with a twist that will be striking enough to wear as a pendant on its own or used as a highlight in your own beaded creation. (4.5)
- Bias-wrapped & Embellished Cylinder:
- Take the basic idea of a spool, and kick it up a couple more notches! We'll make a large "focal bead" with even more "dimension" and then embellish it with one or two sparkly cubic zirconia stones. (5.0)
- Movers & Spinners
- Make one, two, or three of these fun beads that you can later string onto a necklace or bracelet, or turn into earrings.
CCs:
INSERT PHOTOMSs:
INSERT PHOTO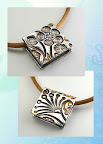
Learn how to make a simple, small, reversible, hollow, silver box.
Your fine silver creation may have a loosely-fitting lid, allowing it to be used as a place to store a special little trinket of your choosing.
If you prefer, instead, to seal its lid in place so you can wear it as a pendant, you'll also learn how to leave a special opening through which to insert a little love note or affirmation that only the wearer need ever know is there.
- Take a simple copper disk, plain or textured.
- Form a piece of metal clay to hug its edge.
- With what's left, consider creating a few metal clay embellishments.
Once it's all been fired, you have the components for a one-of-a-kind pendant, or for a focal piece to use in your own beaded creation.
Learn the basics of working with metal clay, including how to texture it and then shape it over a wire armature of your own design to make a pendant that is absolutely unique to you.
You'll have the choice of designing a piece you'll be proud to wear on its own, or one that you can later string as a focal point in your own beaded creation.
Technique-based Classes
The easiest techniques are listed first.
(Although beginners are welcome to try these classes,
you'll probably get more out of them
if you've previously taken at least one project-based class
or have some other prior experience with metal clay.)
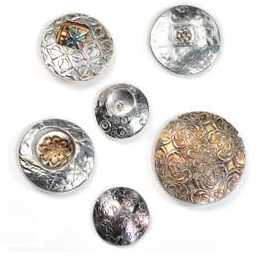
Make a simple textured pendant in any of a number of different shapes, and learn ways to add a decorative "bail" to use in hanging it from a chain, cord, or wire.
The bails covered will be similar, regardless of the session length; the part that varies is how complex the basic pendant piece itself can be.
You've designed and created your own special jewelry item: why finish it off with commercial findings that anyone can buy? Instead, kick that individuality up a notch, by adding your own custom-made findings!
Here are just a few suggestions about what is possible:
- Decorative Headpins
- Basic Toggle Clasps
- Other Decorative Clasps
- Basic End Caps
- Other Decorative End Caps
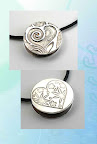
(Inserts show the other side of the reversible fine silver elements.
Click for larger image.)
Make a simple textured pendant or pair of earrings with one or more components that move.
In the first session, we will work with metal clay to construct the basic components. Your pieces will be kiln-fired after this class. Then, in the second session, we will work with wire and other tools to assemble the project.
(Although tools will be provided,
until I manage to acquire a few more,
some sharing among participants may be required.
If you have wire-working experience,
please feel welcome to bring your own tools.)
Make an adjustable by-pass ring, in one of several styles (with ends that overlap or are worn next to each other; with the overlap facing out or worn on the palm-side of your hand; with a pattern that can range from simple to complex; with further options that will be illustrated at the start of class).
This is typically a two-part course. In the first session, we will work with metal clay to construct the basic ring. Your pieces will be kiln-fired after this class. Then, in the second session, we will shape, size, and work-harden the ring.
A three-part course is also available. The first session will be the same as in the version described above. In the second session of this one, you will be able to add additional embellishments to the ring after it has been shaped and sized. The ring will then be fired after this class to secure those elements. In the third-session, we will cover work-hardening and additional finishing techniques.
Make fixed-size ring, in one of several styles (with a narrow or wide shank; with a plain or decorative shank; with a small or large silver top; with a stone set into the top; with a bead wired across the top; with further options that will be illustrated at the start of class or as we plan a small group session).
This is typically a multi-part course.
- First, we will work with metal clay to construct the ring shank. These will be kiln-fired after this session (or during a lunch break). Alternatively, we can use very heavy gauge fine silver wire for our shanks. (I have enough wire-working tools to conduct a private lesson or a very small class; for a larger class, we either need a site that can provide these tools, or to have at least some experienced wire-workers who can bring their own tools.)
- Once the shanks are ready, we will create the components that we will attach and secure to the top of the ring. These will be kiln-fired after this session to improve the ring's relative strength and durability..
- We will either discuss work-hardenting your ring, so that you can complete that step on your own after your ring has been fired, or we can schedule yet one more session where you can complete this step under close supervision.
Private Lessons
For individuals or groups.
Any of the previous classes can be scheduled as either:
- a publicly-advertized class (at a school, shop, etc., where anyone can sign up), or
- a private lesson (for an individual or a small self-organized group).
The remaining sessions are best scheduled on-demand,
by an individual or a group,
and will be customized as needed for that audience.
Still needs a description
Still needs a description
Still needs a description, but can include a mix of:
- Two-part RTV compound
- Polymer Clay
- Photopolymer Plates
- What else?
Still needs a description